I am the author of iOS 17 Fundamentals, Building iOS User Interfaces with SwiftUI, and eight other courses on Pluralsight.
Deepen your understanding by watching!
Basics of Pull to Refresh for Swift Developers
Updated on September 21, 2016 – Swift 3.0
Implementing “pull to refresh” is a common need that arises when working with table views. There are typically two scenarios that folks find themselves in when attempting to implement this feature:
- They’re working with a UITableViewController
- They’re working with a non-UITableViewController, but their view incorporates a regular UITableView, either taking up the whole screen, or a smaller portion of it
This entry will explore both scenarios to help you get up and running quickly with implementing pull to refresh for your Swift iOS app.
Example scenario
For this guide, suppose that we have a list of movies that we’d like to display in a table view. Pulling to refresh will fetch more movies and update the table view to show the new ones.
If you’re the type that likes to simply dive into a working example, both implementations are available to download from GitHub:
- Example implemented with UITableViewController
<li>
  <i class="fab fa-github fa-lg"></i> Example implemented with regular view controller + UITableView <div>
    (<a href="https://github.com/andrewcbancroft/PullToRefreshExample_RegularViewController/tree/swift-2.3">Swift 2.3</a> | <a href="https://github.com/andrewcbancroft/PullToRefreshExample_RegularViewController/tree/master">Swift 3.0</a>)
  </div>
</li>
Note: Code in the main article below is written in Swift 3.0, but code examples for Swift 2.3 are found in the example projects above.
Movies are represented by a simple struct:
1struct Movie {
2    let title: String
3    let genre: String
4}
The table view (regardless of whether we use a UITableViewController or a regular UIViewController) has the following setup…
Initial data source values:
1var movies = [
2    Movie(title: "Lion King", genre: "Animation"),
3    Movie(title: "Star Wars", genre: "Sci-fi")
4]
Setting up the table view’s data source protocol methods depends on whether you’re using a UITableViewController or a regular UIViewController with a table view as one of its content views, so we’ll cover those in the individual examples.
Implementing with UITableViewController
Finish example setup
When working with a UITableViewController, we simply override the data source method implementations. The following is how I’ve chosen to do it for this example:
 1override func tableView(_ tableView: UITableView, numberOfRowsInSection section: Int) -> Int {
 2    return movies.count
 3}
 4
 5override func tableView(_ tableView: UITableView, cellForRowAt indexPath: IndexPath) -> UITableViewCell {
 6    let cell = tableView.dequeueReusableCell(withIdentifier: "cell")!
 7
 8    cell.textLabel?.text = movies[(indexPath as NSIndexPath).row].title
 9    cell.detailTextLabel?.text = movies[(indexPath as NSIndexPath).row].genre
10
11    return cell
12}
Enable refreshing in Storyboard
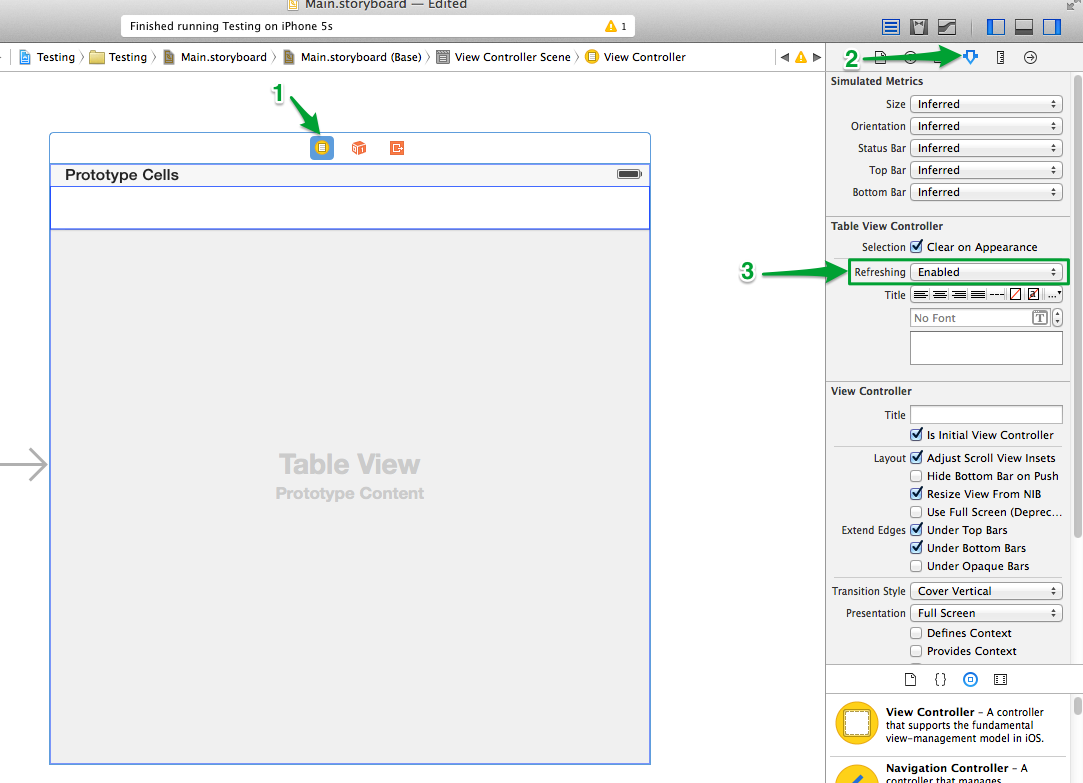
When you’re working with a UITableViewController, the solution is fairly simple: First, Select the table view controller in your storyboard, open the attributes inspector, and enable refreshing:
A UITableViewController comes outfitted with a reference to a UIRefreshControl out of the box. You simply need to wire up a few things to initiate and complete the refresh when the user pulls down.
Override viewDidLoad()
In your override of viewDidLoad(), add a target to handle the refresh as follows:
1override func viewDidLoad() {
2    super.viewDidLoad()
3    // Do any additional setup after loading the view, typically from a nib.
4
5    self.refreshControl?.addTarget(self, action: #selector(ViewController.handleRefresh(_:)), for: UIControlEvents.valueChanged)
6}
Here are a couple of things to observe about the code above:
- Swift’s new #selector feature helps with specifying which action will handle the refresh. Since I’ve specified
ViewController.handleRefresh(_:)(note the underscore and the colon!) as the action argument, I need to define a function in thisUITableViewControllerclass with the same name. Additionally, the function should take one argument. - We’d like this action to be called for the
UIControlEventcalledValueChanged.
Implement handleRefresh function
The handleRefresh: function may look something like the following:
 1func handleRefresh(refreshControl: UIRefreshControl) {
 2    // Do some reloading of data and update the table view's data source
 3    // Fetch more objects from a web service, for example...
 4
 5    // Simply adding an object to the data source for this example
 6    let newMovie = Movie(title: "Serenity", genre: "Sci-fi")
 7    movies.append(newMovie)
 8
 9    movies.sort() { $0.title < $1.title }
10
11    self.tableView.reloadData()
12    refreshControl.endRefreshing()
13}
That should complete the pull to refresh implementation when you’re working with a UITableViewController!
Implementing with regular view controller + UITableView
Finish example setup
When working with a regular UIViewController, there are a few extra steps involved in getting things set up:
- Create an IBOutlet from the storyboard to the view controller
- Wire up the table view’s data source and delegate from the storyboard
- Implement the required table view data source methods
Creating the IBOutlet is a matter of control+clicking and dragging from the table view in the Storyboard to the view controller code to create the outlet.
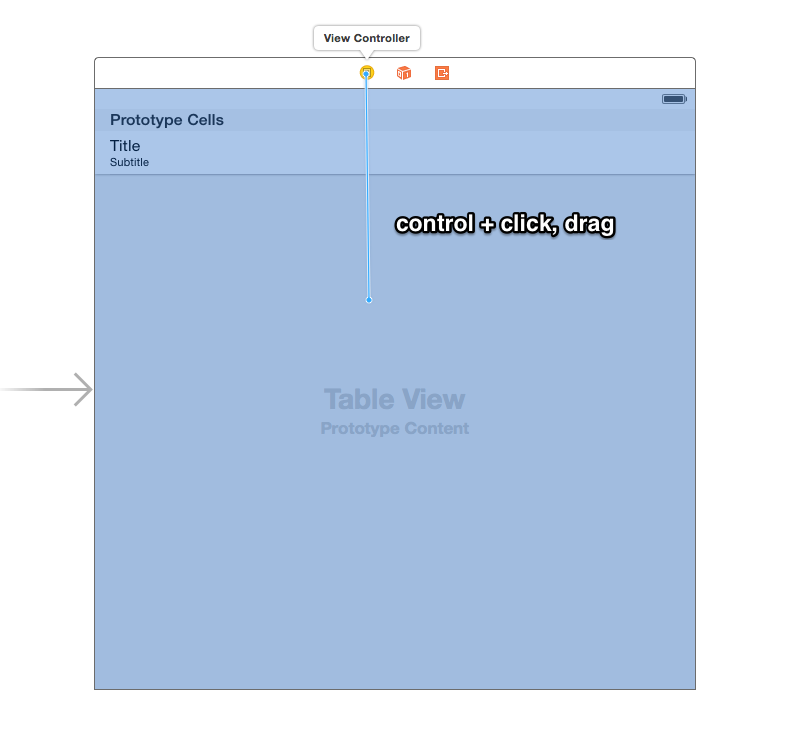
To wire up the table view’s data source and delegate in the Storyboard, control+click the table view and drag up to the yellow view controller icon:
The data source protocol method implementations may look something like this:
 1 Int {
 2    return movies.count
 3}
 4
 5func tableView(_ tableView: UITableView, cellForRowAt indexPath: IndexPath) -> UITableViewCell {
 6    let cell = tableView.dequeueReusableCell(withIdentifier: "cell")!
 7
 8    cell.textLabel?.text = movies[(indexPath as NSIndexPath).row].title
 9    cell.detailTextLabel?.text = movies[(indexPath as NSIndexPath).row].genre
10
11    return cell
12}
Set up UIRefreshControl
Whereas a UITableViewController comes pre-fit with a UIRefreshControl, a regular UIViewController does not. It’s simple enough to set one up though. Here is a snippet defining a lazily instantiated variable which creates and configures a UIRefreshControl:
1lazy var refreshControl: UIRefreshControl = {
2    let refreshControl = UIRefreshControl()
3    refreshControl.addTarget(self, action: #selector(ViewController.handleRefresh(_:)), for: UIControlEvents.valueChanged)
4
5    return refreshControl
6}()
The most complicated thing about the code I just proposed is how the UIRefreshControl instance is assigned lazily by means of the closure expression denoted by = { // ...closure body with setup code... }() in the above snippet. Using this approach allows me to complete the setup all in one spot without the use of optionals. You may prefer doing this another way. The bottom line goal is to have a UIRefreshControl instance that we can add to the table view (coming up).
As for the body of the closure expression, we’re adding a target-action to the UIRefreshControl instance, just like we did when we were dealing with a UITableViewController.
As with the UITableViewController example, note:
- Since I’ve specified “handleRefresh:” (note the colon!) as the action argument, I need to define a function in this
UITableViewControllerclass with the same name. Additionally, the function should take one argument. - We’d like this action to be called for the
UIControlEventcalledValueChanged.
Override viewDidLoad
Assuming that there is an outlet to the table view in the Storyboard, the next step is to add the UIRefreshControl as a subview to the table view:
1override func viewDidLoad() {
2    super.viewDidLoad()
3    // Do any additional setup after loading the view, typically from a nib.
4
5    self.tableView.addSubview(self.refreshControl)
6}
Implement handleRefresh function
The handleRefresh function is implemented exactly as it was when we were dealing with a UITableViewController:
 1func handleRefresh(refreshControl: UIRefreshControl) {
 2    // Do some reloading of data and update the table view's data source
 3    // Fetch more objects from a web service, for example...
 4
 5    // Simply adding an object to the data source for this example
 6    let newMovie = Movie(title: "Serenity", genre: "Sci-fi")
 7    movies.append(newMovie)
 8
 9    movies.sort() { $0.title < $1.title }
10
11    self.tableView.reloadData()
12    refreshControl.endRefreshing()
13}
Wrapping up
Implementing “pull to refresh” is a common need that arises when working with table views. Here we’ve explored how to implement this feature using both a UITableViewController and with a regular view controller and a table view.