I am the author of iOS 17 Fundamentals, Building iOS User Interfaces with SwiftUI, and eight other courses on Pluralsight.
Deepen your understanding by watching!
Fundamentals of NSNotificationCenter in Swift
Updated on September 19, 2016 – Xcode 8 & Swift 3.0
The goal of this post is to help you grasp the fundamentals of using NSNotificationCenter in your Swift iOS app. The topic isn’t necessarily new, and there’s no difference except syntax between Objective-C and Swift implementations involving NSNotificationCenter. Even still, I’m hoping to add to the understanding of this useful tool by giving a fully-working example on GitHub (Swift 2.3 and Swift 3.0), and by sharing the insight that’s clicked in my own brain as I explain the example.
Note: Code in the main article below is written in Swift 3.0, but code examples for Swift 2.3 are found in the example project.
First things first: What is this thing?
When I first heard NSNotificationCenter, I thought “push notifications”. However, NSNotificationCenter has nothing to do with sending or receiving push notifications in iOS. Rather, it is a communication tool internal to your app. It provides a way for one instance of a class/struct to notify one or more other class/struct instances about something. The goal in doing this is to enable those 1+ other class or struct instances to take appropriate action based the communication they receive. An common analogy comes to mind: think “radio tower”. NSNotificationCenter is the central hub that acts as a broadcaster of notifications. If that still seems vague, hang tight – seeing the example below should help it all come together for you.
Should I use it?
Before diving into the basic workflow, it’s worth asking, “Should I use NSNotificationCenter, or is there some other option that’s more appropriate for my app’s internal communication needs?”
It is often the case that there is more than one way to solve a problem in software development, and it’s no different with NSNotificationCenter. There is more than one way to accomplish instance-to-instance communication at run-time. I’ve written about two such forms of communication in my post titled NSNotificationCenter vs Delegation – An Analysis. It may be worth reading up on, just to make sure you’re using the right tool for the right kind of communication.
Basic Workflow
NSNotificationCenter.default is at the center of it all when it comes to this discussion.
The basic workflow of using NSNotificationCenter goes something like this:
- Since `NSNotificationCenter` is in the business of broadcasting notifications, the first thing to do is to specify a way to uniquely identify a notification. This is most easily accomplished by defining a constant string value (using `let` syntax in Swift) at a globally-visible scope. The string constant you define here will serve as a “notification key”. If you have several notification keys that you need to define, perhaps creating a new .swift file called “NSNotificationCenterKeys.swift” is a clean way to do this.
- Steps 2 and 3 of the workflow go hand-in-hand. Without implementing the one, implementing the other doesn’t make much sense… Step 2 is to post a notification to `NSNotificationCenter.default` identified by the key that was created in step 1. In radio terms, the class or struct instance desiring to post a notification asks the default notification center to broadcast the notification key defined in step 1… this class or struct instance chooses the right situations to request that the notification key be sent out based on business logic specific to the project’s requirements.
- Step 3 is to set up 1+ class or struct instances to be listeners, or more properly, observers of a particular notification. Such an observer will be able to tell that it’s “heard” the notification, because it will be “listening for” a notification that uses the same key that was created in step 1, which is the key used in step 2 to post the notification. In radio terms, the listener is tuned in to the default notification center’s station that’s identified by that special key defined in step 1 and posted in step 2. So you see now why steps 2 and 3 go hand-in-hand. With no posts to the notification center on that station, tuning in will do no good. Likewise, posting a notification but having no listeners accomplishes nothing.
- Finally, what should the observing instance do once it’s detected the notification? Well, when signing up to be an observer, the instance must also specify the name of a function that will be called upon receipt of the notification it’s listening for. Whatever action or routine is appropriate to perform at that time is what that function’s implementation should contain.
Visualizing NSNotificationCenter by Example
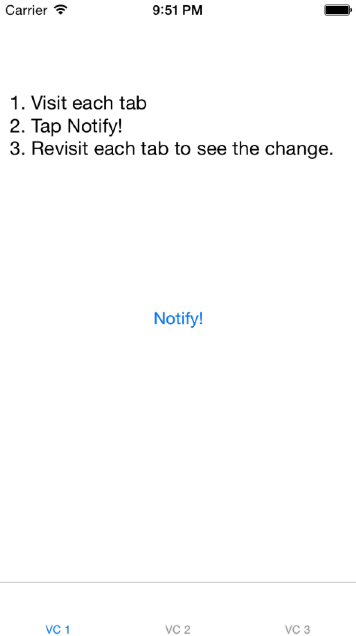
If you’re like me, you need less talk and more example, so I’ve created a simple Xcode project that you can grab over at GitHub (Swift 2.3 and Swift 3.0). Running the project will allow you to click through a series of tabs in a tab view controller, post a notification, and see the results. It looks much like this:
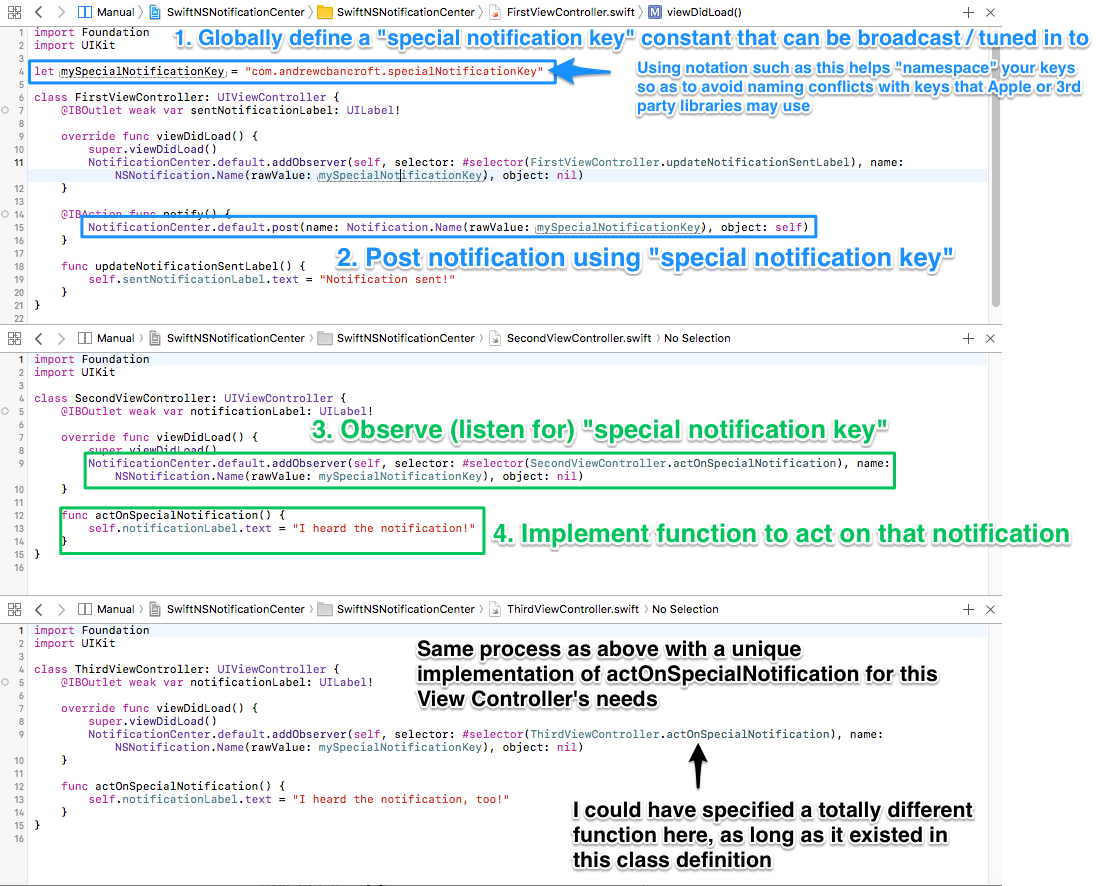
Working back through the basic workflow with this example you can find the following key aspects of implementing a NSNotificationCenter solution (lines of code to pay special attention to will be highlighted).
Steps 1 and 2:
I’ve chosen my FirstViewController class to be the one that defines the global constant with a unique notification key and tells the default notification center to post that notification when the “Notify!” button is tapped:
 1// 1. Globally define a "special notification key" constant that can be broadcast / tuned in to...
 2let mySpecialNotificationKey = "com.andrewcbancroft.specialNotificationKey"
 3
 4class FirstViewController: UIViewController {
 5    @IBOutlet weak var sentNotificationLabel: UILabel!
 6
 7    override func viewDidLoad() {
 8        super.viewDidLoad()
 9        NotificationCenter.default.addObserver(self, selector: #selector(FirstViewController.updateNotificationSentLabel), name: NSNotification.Name(rawValue: mySpecialNotificationKey), object: nil)
10    }
11
12    // 2. Post notification using "special notification key"
13    @IBAction func notify() {
14        NotificationCenter.default.post(name: Notification.Name(rawValue: mySpecialNotificationKey), object: self)
15    }
16
17    func updateNotificationSentLabel() {
18        self.sentNotificationLabel.text = "Notification sent!"
19    }
20}
Steps 3 and 4:
Both of these steps are implemented in very similar ways in my SecondViewController and ThirdViewController classes. The code should speak for itself:
 1class SecondViewController: UIViewController {
 2    @IBOutlet weak var notificationLabel: UILabel!
 3
 4    override func viewDidLoad() {
 5        super.viewDidLoad()
 6
 7        // 3.  Observe (listen for) "special notification key"
 8        NotificationCenter.default.addObserver(self, selector: #selector(SecondViewController.actOnSpecialNotification), name: NSNotification.Name(rawValue: mySpecialNotificationKey), object: nil)
 9    }
10
11    // 4.  Implement function to act on that notification
12    // The name of this function must match the selector argument you specified when you called addObserver()
13    func actOnSpecialNotification() {
14        self.notificationLabel.text = "I heard the notification!"
15    }
16}
17
18
19class ThirdViewController: UIViewController {
20    @IBOutlet weak var notificationLabel: UILabel!
21
22    override func viewDidLoad() {
23        super.viewDidLoad()
24        NotificationCenter.default.addObserver(self, selector: #selector(ThirdViewController.actOnSpecialNotification), name: NSNotification.Name(rawValue: mySpecialNotificationKey), object: nil)
25    }
26
27    func actOnSpecialNotification() {
28        self.notificationLabel.text = "I heard the notification, too!"
29    }
30}
Finally, to reiterate the explanation in visual form and for easy reference, I’ve annotated a screen shot taken from the project’s code:
Removing an observer
One final requirement for working with NSNotificationCenter is to remove an observer when it no longer needs to listen for notifications. When might this situation arise?
- When the observer is no longer referenced and thus deallocated from memory, it should tell the default notification center that it can be removed
- When some condition occurs in your application that renders it no longer relevant for an instance to listen for notifications
The first situation is the most common, and is for sure the scenario that we want to protect against, so that the default notification center doesn’t continue to manage observers that are no longer capable of actively listening. To satisfy the requirement of removing an observer when an instance is deallocated, we could provide something like the following deinit method:
1deinit {
2    NSNotificationCenter.default.removeObserver(self)
3}
For the second bullet point, you can simply write the same line of code that’s highlighted in the above snippet, wherever it makes sense for you to tell the default notification center when it’s appropriate to stop sending messages to the instance in question.
Summary
NSNotificationCenter is particularly useful when there are multiple class or struct instances that need to take action based on something that happens elsewhere in your application. For this type of scenario, NSNotificationCenter can be a great tool to wield as you develop apps in Swift for iOS.