I am the author of iOS 17 Fundamentals, Building iOS User Interfaces with SwiftUI, and eight other courses on Pluralsight.
Deepen your understanding by watching!
Slide In Animation in Swift
In a previous post about fade animations in Swift, I demonstrated how to use a class extension to add the ability for any UIView instance to easily call fadeIn() or fadeOut() on itself. This strategy was nice – the animations, while simple, would have cluttered my code each time I used them, had I not encapsulated them somewhere. Employing class extensions in Swift seemed a natural way to provide this functionality to UIViews.
Well, I liked the idea so much that when it came time for me to implement a slide animation, I kept the same strategy, and I’d like to share my implementation with you today.
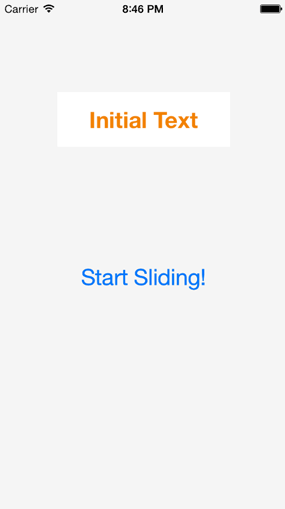
Animation demo
To start off with, here’s a sample of what the animation does:
The easiest way to get the gist of what I’ve done is to head over to GitHub and download the example Xcode Project. In real life, I’ve combined the fade animations and the slide animation into the same UIView extension, but for education’s sake, I’ve split them out so you can easily see the moving parts.
Implementation overview
There are three major parts to this example implementation, which I’ll explain in detail shortly. Here’s the overview:
1 – Create the UIView extension
 1import UIKit
 2
 3extension UIView {
 4    // Name this function in a way that makes sense to you...
 5    // slideFromLeft, slideRight, slideLeftToRight, etc. are great alternative names
 6    func slideInFromLeft(duration: NSTimeInterval = 1.0, completionDelegate: AnyObject? = nil) {
 7        // Create a CATransition animation
 8        let slideInFromLeftTransition = CATransition()
 9
10        // Set its callback delegate to the completionDelegate that was provided (if any)
11        if let delegate: AnyObject = completionDelegate {
12            slideInFromLeftTransition.delegate = delegate
13        }
14
15        // Customize the animation's properties
16        slideInFromLeftTransition.type = kCATransitionPush
17        slideInFromLeftTransition.subtype = kCATransitionFromLeft
18        slideInFromLeftTransition.duration = duration
19        slideInFromLeftTransition.timingFunction = CAMediaTimingFunction(name: kCAMediaTimingFunctionEaseInEaseOut)
20        slideInFromLeftTransition.fillMode = kCAFillModeRemoved
21
22        // Add the animation to the View's layer
23        self.layer.addAnimation(slideInFromLeftTransition, forKey: "slideInFromLeftTransition")
24    }
25}
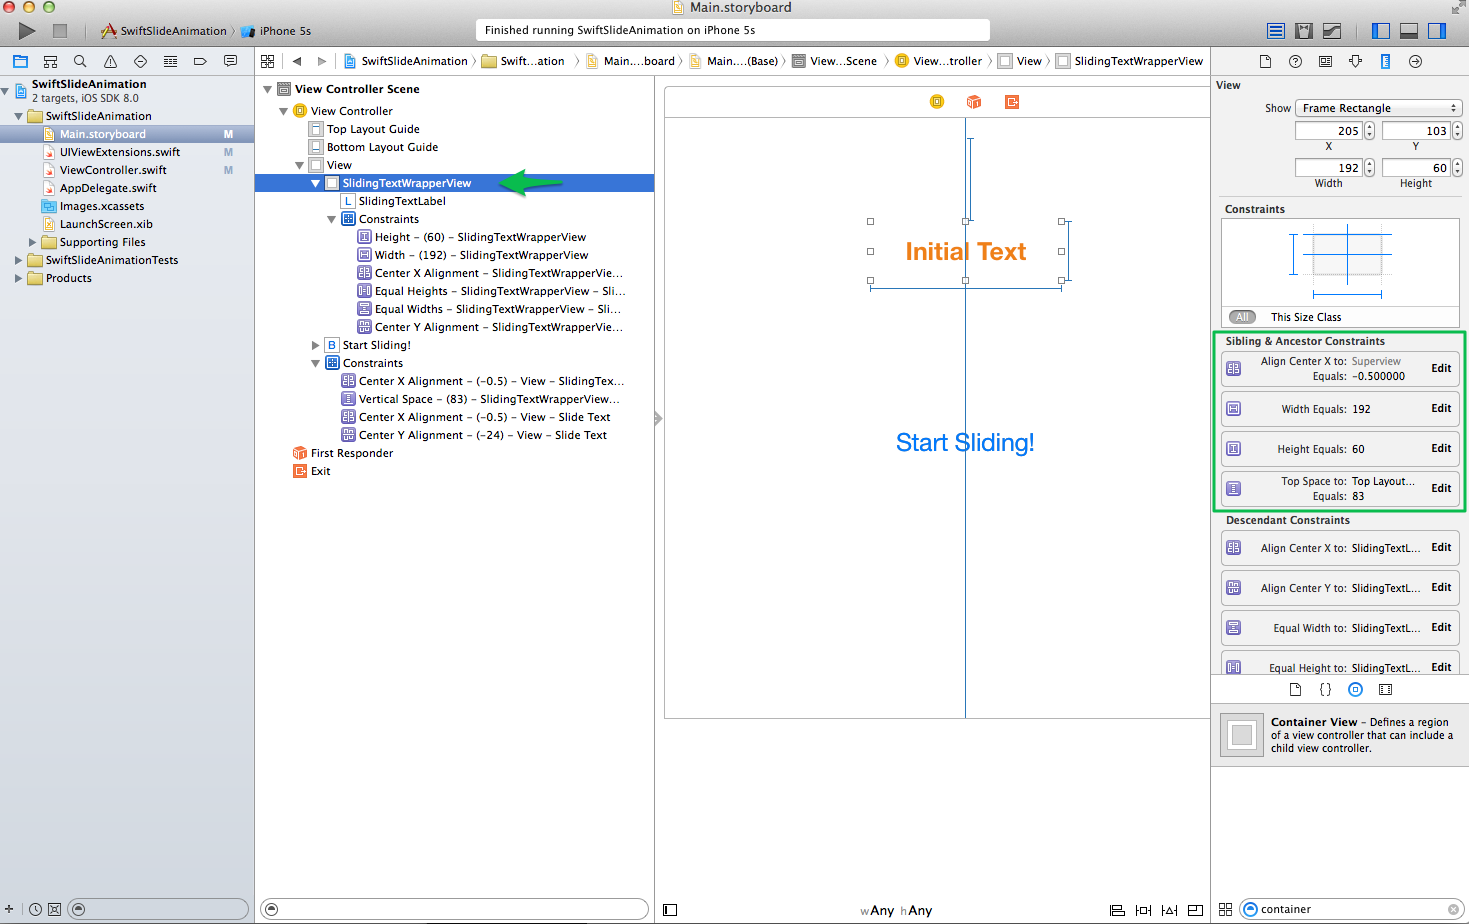
2 – Set up the storyboard
- From the Utilities panel, drag over a regular View to act as a wrapper for the sliding text (use a regular View, not a Container View)
- From the Utilities panel, drag a Label into the wrapper view and create an IBOutlet to your View Controller for the Label
- Set up auto layout constraints for both the wrapper and the Label
- Set the wrapper view’s Clip Subviews property to checked in the Attributes Inspector
3 – Code the View Controller – initiate slide animation.
In my example, I wired the trigger up to a button’s touchUpInside action. For you, it may be something different that triggers the animation to begin. Whatever it may be, call slideInFromLeft() on your UIView instance (in my case, the UILabel).
1@IBAction func slideTextButtonTapped(sender: UIButton) {
2        self.slidingTextLabel.slideInFromLeft()
3        self.slidingTextLabel.text = "Sliding Text!"
4    }
Notice that directly after the call to slideInFromLeft(), I change the label’s text property to contain the new text that I want to slide in.
Implementation details
The real work all happens inside the UIViewExtensions.swift file where I add the slideInFromLeft() function to a UIView’s arsenal.`
UIViewExtensions.swift
First to note is that I’ve provided a few default values in the function’s signature so that the animation can be initiated as simply as writing viewInstance.slideInFromLeft(), or as “complicated” as providing argument values to both duration and completionDelegate:
1extension UIView {
2    func slideInFromLeft(duration: NSTimeInterval = 1.0, completionDelegate: AnyObject? = nil) {
3    // Implementation...
4}
Next, I create a CATransition instance, and set its delegate property if a completionDelegate is passed when the function is called:
1extension UIView {
2    func slideInFromLeft(duration: NSTimeInterval = 1.0, completionDelegate: AnyObject? = nil) {
3        let slideInFromLeftTransition = CATransition()
4
5        if let delegate: AnyObject = completionDelegate {
6            slideInFromLeftTransition.delegate = delegate
7        }
8            // Remaining implementation...
9}
I then go about configuring the animation’s properties. To achieve the “slide in from left” animation, I set the type and the subtype properties to kCATransitionPush and kCATransitionFromLeft, respectively. These two combined create the “slide in” effect. Other properties that I set are duration, timingFunction, and fillMode:
 1extension UIView {
 2        // ...
 3        slideInFromLeftTransition.type = kCATransitionPush
 4        slideInFromLeftTransition.subtype = kCATransitionFromLeft
 5        slideInFromLeftTransition.duration = duration
 6        slideInFromLeftTransition.timingFunction = CAMediaTimingFunction(name: kCAMediaTimingFunctionEaseInEaseOut)
 7        slideInFromLeftTransition.fillMode = kCAFillModeRemoved
 8
 9        // ...
10    }
11}
To keep things simple, I only allow myself to customize the duration property, and optionally provide a completionDelegate when I call the function… the other properties are more fundamental to how the animation should perform, so I encapsulate the implementation here so that it’s an abstraction when I actually call slideInFromLeft() later in my View Controller.
The last thing I do is add the animation that I just created and configured to the view’s layer property. “The view” here would be the instance of UIView that has calls slideInFromLeft():
1extension UIView {
2        // ...
3        self.layer.addAnimation(slideInFromLeftTransition, forKey: "slideInFromLeftTransition")
4    }
5}
Storyboard setup details
This is probably the more challenging piece, just because it takes some tweaking to get the auto layout constraints just right.
- My general setup in this example is a Label wrapped inside a containing UIView. I made sure to simply drag over a regular View (not a Container View) from the utilities pane on the right. I then dragged a Label inside the “wrapper” view.
- I set wrapper view’s width to a value that was less than the entire screen’s width. This was so that the sliding view didn’t appear to slide in from off-screen and slide out off-screen. Instead it appears to slide in from underneath the wrapper view… You’re welcome to customize this how you want (or avoid the containing view altogether if you find it’s not needed for your specific implementation).
- For the wrapper view, I’ve set constraints for
- Center Horizontally in Container
- Top Space to Top Layout Guide
- Width
- Height
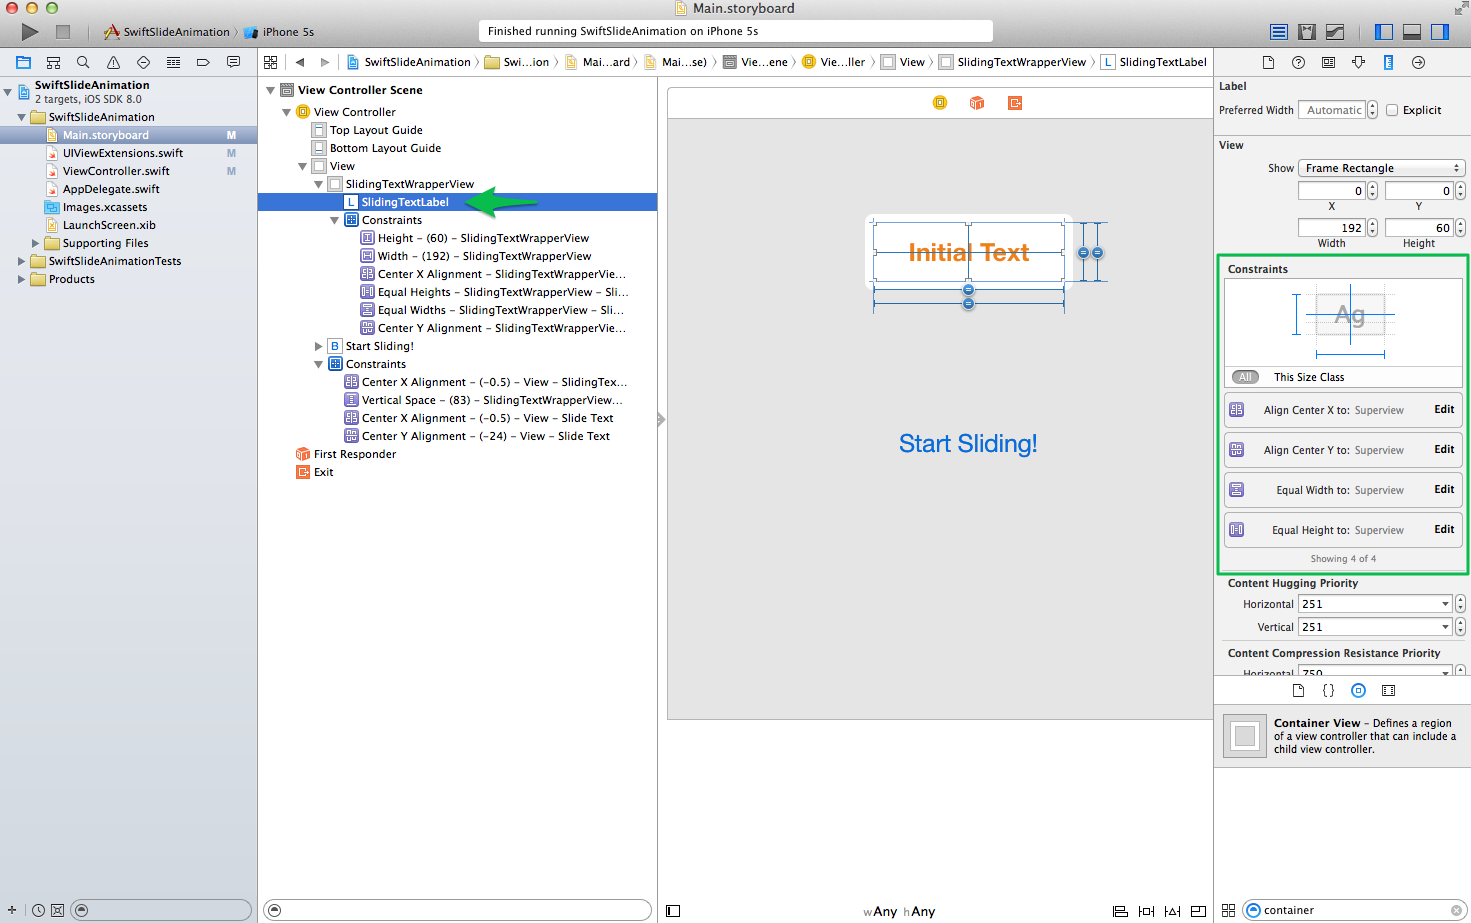
Next, I made sure that my label that will be sliding is inside the wrapper view. I set its constraints to
- Center Horizontally in Container
- Center Vertically in Container
- Equal Widths
- Equal Heights
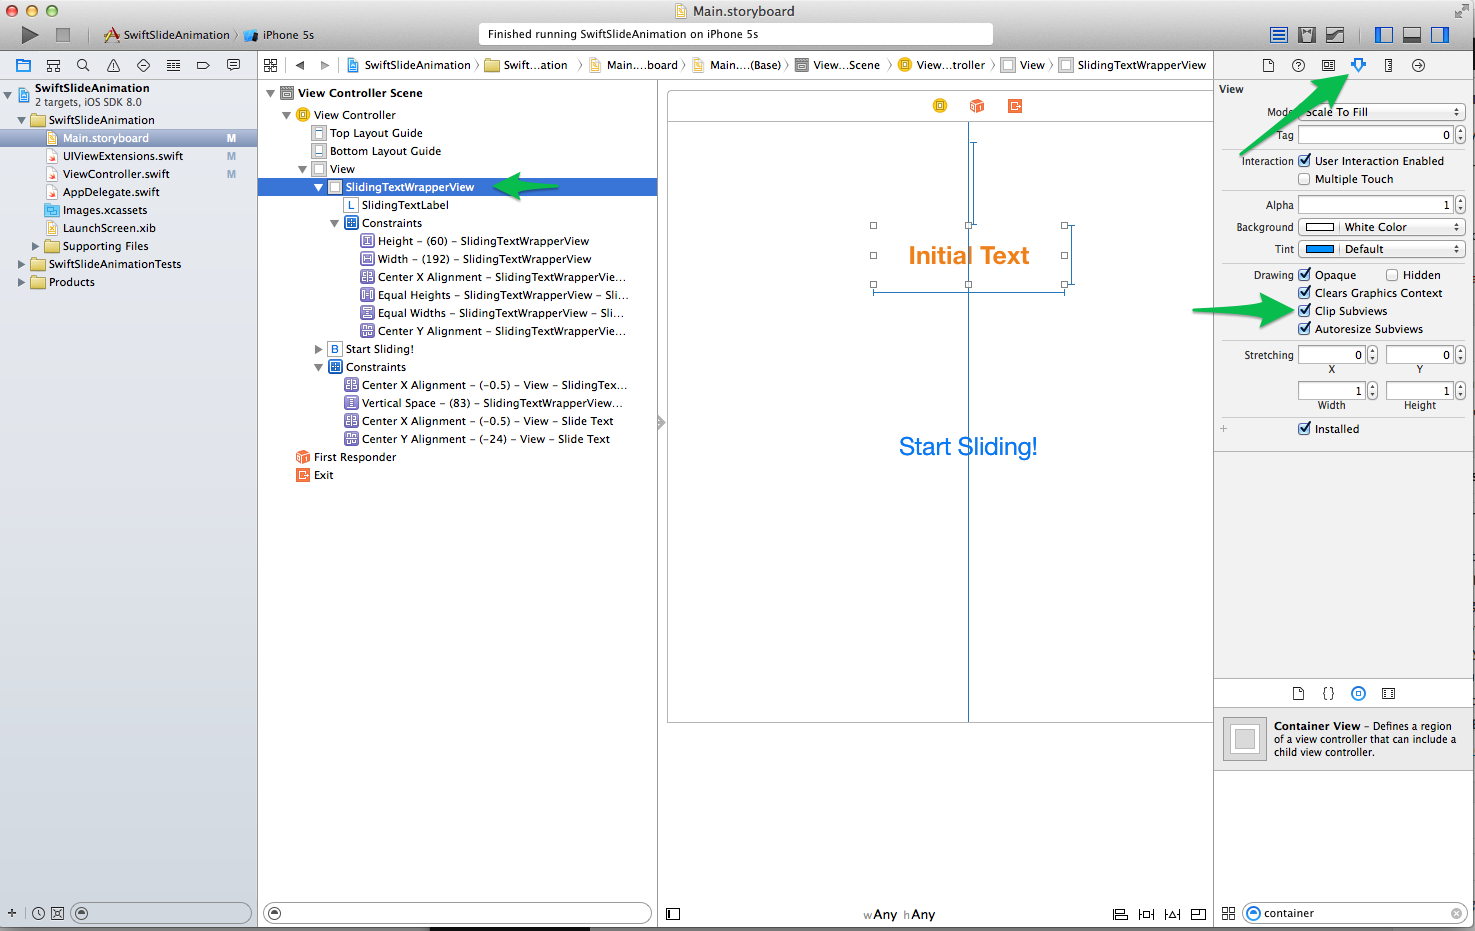
The last thing I do in the storyboard before wiring things in the View Controller is to select the wrapper view and make sure it’s Clip Subviews property is checked. As an experiment, toggle this option and watch the effect it has on the animation’s appearance:
View controller implementation
The final piece of the setup is to wire things up to the View Controller and animate the Label.
Since I needed to reference the Label containing the text that I’d like to animate, I created an IBOutlet from my storyboard to my View Controller:
1class ViewController: UIViewController {
2    @IBOutlet weak var slidingTextLabel: UILabel!
3    // ...
4}
Next, I needed a way to initiate the slide in animation – I decided that wiring it to a button’s touchUpInside action would be sufficient for the example, so I created an IBAction from my Storyboard to my View Controller for that purpose.
Within the body of that IBAction, I wrote the call to slideInFromLeft() on my slidingTextLabel instance:
 1import UIKit
 2
 3class ViewController: UIViewController {
 4    // ...
 5    @IBAction func slideTextButtonTapped(sender: UIButton) {
 6        self.slidingTextLabel.slideInFromLeft()
 7//      self.slidingTextLabel.slideInFromLeft(duration: 1.0, completionDelegate: self) // Use this line to specify a duration or completionDelegate
 8        self.slidingTextLabel.text = "Sliding Text!"
 9    }
10
11    // ...
12}
If you have need to specify a duration or a completionDelegate, there’s a commented out line of code there that shows an example of passing those arguments to the slideInFromLeft() function.
If you specify a completionDelegate to the slideInFromLeft() function, a method called animationDidStop() will be called when the animation finishes. Inside this callback function, you can write code to perform any action you’d like to have happen after the animation has finished. If you don’t set a completionDelegate, there’s no need to have this method override in your code:
1override func animationDidStop(anim: CAAnimation!, finished flag: Bool) {
2        println("Animation stopped")
3    }
That’s a wrap, folks! Hope this strategy is helpful for you as you think about where to place code for your UIView animations.