I am the author of iOS 17 Fundamentals, Building iOS User Interfaces with SwiftUI, and eight other courses on Pluralsight.
Deepen your understanding by watching!
Taking First Steps With SwiftUI
Enabling SwiftUI
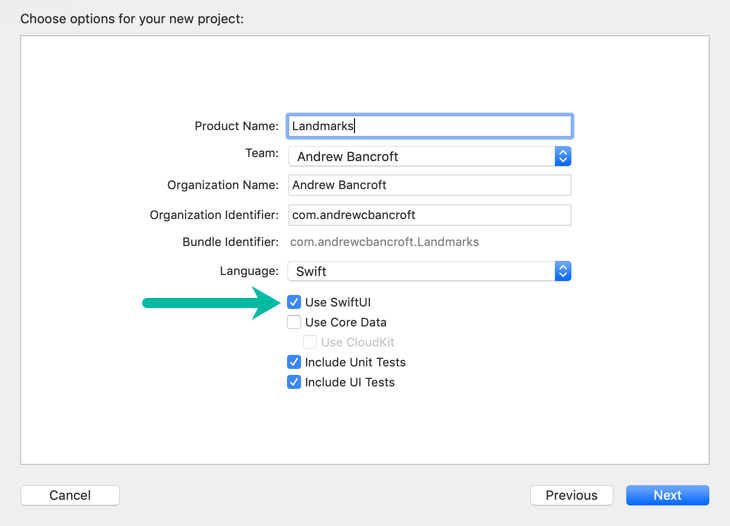
Opting in to using SwiftUI is as easy as creating a new project with Xcode 11 and clicking the “Use SwiftUI” checkbox.
Starting Point
Xcode will give you two structs to start with:
- One that describes the
View’s content and layout - One that declares a preview for that
View
View
1struct ContentView: View {
2    var body: some View {
3        // This is where you describe the view's content, layout, and behavior
4    }
5}
A view’s content, layout, and behavior get described in the body property.
Preview
1struct ContentView_Previews : PreviewProvider {
2    static var previews: some View {
3        ContentView()
4    }
5}
Seeing What You’re Doing
Xcode gives you a canvas so that you can visually see what your SwiftUI code is doing.
Open it by clicking Editor > Editor and Canvas
Wait, Where’s the Canvas?
If you don’t have the option to view the canvas in Xcode, it’s because this feature requires you to be running macOS Catalina.
Don’t feel left out of the SwiftUI fun, though! Just press command + R to see everything load up in the iOS 13 Simulator.
If you’re learning, you might opt to use SwiftUI in a Playground for a more convenient workflow!
Syncing Changes Between SwiftUI Code and Xcode’s Canvas
Changing and saving your SwiftUI view code automatically updates the canvas preview.
Changing the view using Xcode’s view inspector automatically updates your SwiftUI code!
I love this quote:
Your code is always the source of truth for the view. When you use the inspector to change or remove a modifier, Xcode updates your code immediately to match.
Combining Views: The Key is Stacks
1struct ContentView: View {
2    var body: some View {
3        // This is where you describe the view's content, layout, and behavior
4    }
5}
A view’s content, layout, and behavior get described in the body property.
body only returns a single view, though.
To combine multiple views together, you use a stack.
Stacks can be vertical (VStack), horizontal (HStack), or “back-to-front” (ZStack).
Spacing Things Out
Use a Spacer to make a containing view expand out to use all of its parent view
 1struct ContentView : View {
 2    var body: some View {
 3        VStack(alignment: .leading, spacing: nil) {
 4            Text("Turtle Rock")
 5                .font(.title)
 6
 7            HStack{
 8                Text("Joshua Tree National Park")
 9                    .font(.subheadline)
10
11                Spacer() // Make the horizontal stack use up all the horizontal space of the parent VStack
12
13                Text("California")
14                    .font(.subheadline)
15            }
16        }
17    }
18}
Giving Views Some Breathing Room
Use the padding() modifier to give a view some breathing room.