Setting Up Carthage for the Terminal-Timid
The old adage “Don’t go reinventing the wheel” comes into play often when developing software, doesn’t it? Why build this [thing] ourselves when someone else has invented it already?
Fantastic libraries and frameworks exist out there to assist developers with common and sometimes even difficult problems. Whether it be an easier-to-use abstraction over the networking stack with AFNetworking or AlamoFire, or adding a popular behavior-driven development testing framework like Quick to our workflow, we find ourselves constantly wanting to be able to take advantage of the things that others are doing in the community so we don’t have to invent that wheel again ourselves.
The need for dependency management
With that comes the need for an easy way to manage external dependencies in our projects. We find the need to make sure that our projects have the right versions of whatever libraries or frameworks we’re bringing in. We want to ensure that if we move to another machine or add folks to our teams that they can go and restore all those same external dependencies without a lot of hassle. Therein lies at least partial justification for the usage of dependency managers.
The long-running “king of the hill” of dependency management for iOS developers has been the ever-popular CocoaPods. However, there’s a new kid on the block, and its picking up popularity. This “new” dependency manager is called Carthage.
What is Carthage?
From the GitHub repository’s main page for Carthage (emphasis mine):
Carthage is intended to be the simplest way to add frameworks to your Cocoa application… Ultimately, we created Carthage because we wanted the simplest tool possible—a dependency manager that gets the job done without taking over the responsibility of Xcode, and without creating extra work for framework authors.
I’ve used Carthage for simple tasks like bringing in Quick for unit testing. It delivers on the promise of being simple, but even in its simplicity, installing and using Carthage requires the use of the Terminal.
Terminal tension
If you’ll withhold judgement of this confession, I’ll openly share that I’m not a whiz on the command line. I have found that the more I spend time in the Terminal, the less timid I become. It’s been a gradual transition into spending intentional time on the command line, but I share this to simply relate to those of you who, like me, find themselves thinking, “Really? All of this involves running commands in the Terminal? Ugh…”
Hang in there. Becoming proficient at this will take practice, but it’s worth it. Carthage really does make your dependency management simpler and more shareable with your team. Even if you’re working alone, I recommend investing the time to overcoming any anxiety you may have around the Terminal.
Installing Carthage
So here’s the deal: The folks on the Carthage team have actually made it pretty easy to install Carthage without the Terminal. If you go to their releases page on GitHub and download + run the Carthage.pkg file for the latest release, you’ll be set up. BUT, Carthage is a command-line tool, so to use it, you’ll still need the Terminal.
With that in mind, I’ve decided to get used to working with this tool totally from the command-line from the start, which means installing it from the Terminal window. There’s a couple more steps involved, but I’d argue that it’s good practice. If you’re wanting to overcome your anxiety around the Terminal, skip the .pkg installation method and continue on.
Terminal installation
Installing Carthage from the command line assumes that you have a package manager for OSX called “Homebrew” installed on your Mac. If you don’t, you need it. And yes, it involves the Terminal too, but don’t worry – I’ve got you covered in the steps to follow. We’ll use Homebrew to install Carthage which will be used to manage the external dependencies in our app.
First things first – installing Homebrew
Installing Homebrew isn’t complicated. It just involves knowing the command to run in the Terminal to get it downloaded and registered in your machine.
From the Homebrew homepage we learn that the installation simply requires us to type in the following in the Terminal:
ruby -e "$(curl -fsSL https://raw.githubusercontent.com/Homebrew/install/master/install)"
Pasting in the command and pressing enter will immediately produce a lot of stuff in the terminal window. It’s okay. Don’t panic.
It’s simply letting you know what’s about to happen if you agree to continue:
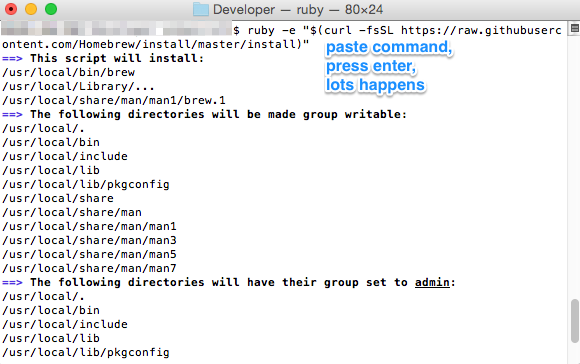
So it’s going to…
- Install some files into some directories on your computer.
- Change the read-write permissions on some directories to be group writable. This allows Homebrew to do its thing when you tell it to.
- Change those same directories’ group to admin. So these last two bullet points go together.
You’re prompted to press ‘RETURN’ to continue (or anything else to stop the installation). If you’re good with the changes it describes to you, press ‘RETURN'.
Yikes! What’s all this now?
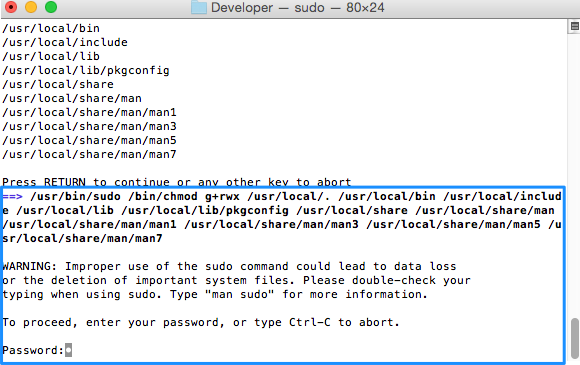
Well, for the installation to continue, Homebrew needs to elevate the level of permissions it has in order write all the files it needs to write and to set all the permissions it needs to set. Under the hood, it’s run a sudo command. It requires your password to authorize this elevation. Go ahead and type your password, and press ‘RETURN’ to continue.
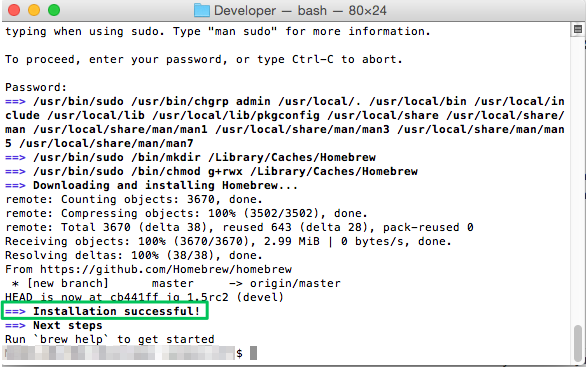
The installation will continue by downloading all of the necessary files and performing all the changes it said it’d make. When it’s done, you’ll get an “Installation Successful” message:
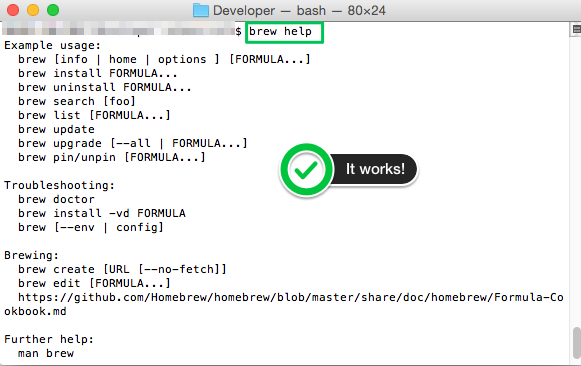
Sweet! To test it out, you can simply type brew help like it suggests in the line below the “Installation successful!” message. It should print out a bunch of stuff to the Terminal window, explaining how to use Homebrew:
Well done! We can now use Homebrew to install Carthage. You can use it to install all kinds of other fantastic utilities as well, but for now we’ll focus on the Carthage installation…
Now to install Carthage
With Homebrew installed, we’re almost there. From the Carthage GitHub repository page, we learn what commands to run on the command line to get Carthage installed.
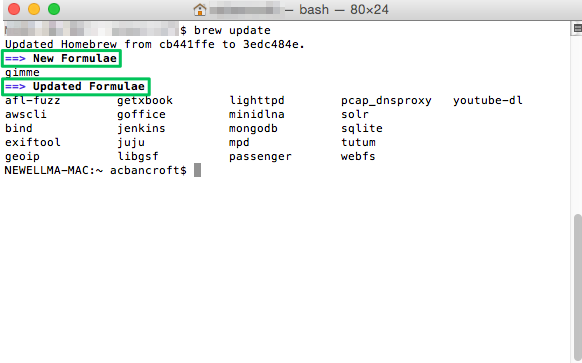
First, we run brew update to make sure that Homebrew is totally up-to-date. If you just installed Homebrew for the first time, you’re probably good to go. Just to be safe though, go ahead and run it.
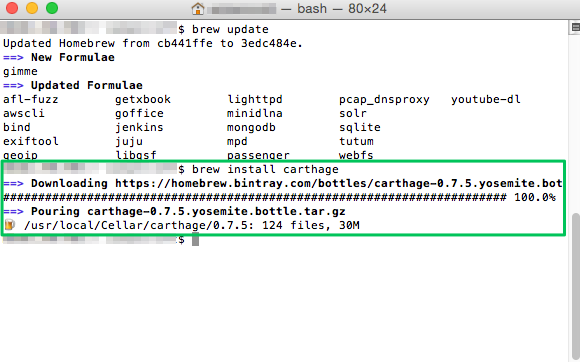
The last step is to run brew install carthage. Yes. It’s that simple. Homebrew will take care of everything else for you! Here’s the final result:
Cartfiles
Once Carthage is installed, it’s time to create your Cartfile file. After I read the documentation on how to set this up, I found myself doubting whether I’d done it right, so again, to alleviate any fears our there around the mystery of what’s going on I’ll share what I’ve discovered.
First of all, the documentation merely says, “Create a Cartfile that lists the frameworks you’d like to use in your project.” I scratched my head and asked, “Okay – well, where? And should it have a file extension?”
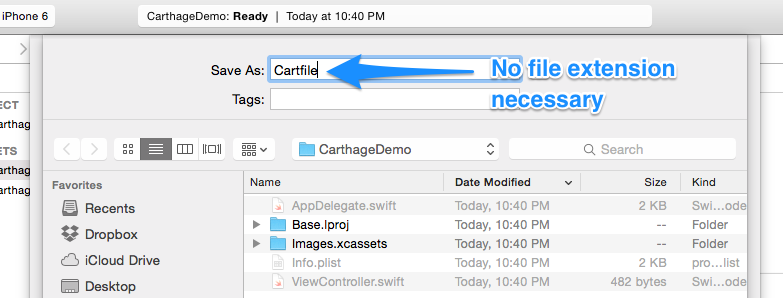
The answers that worked for me were, “Somewhere in your Xcode project (I put it under Supporting Files)” and “No file extension…just the name Cartfile works”.
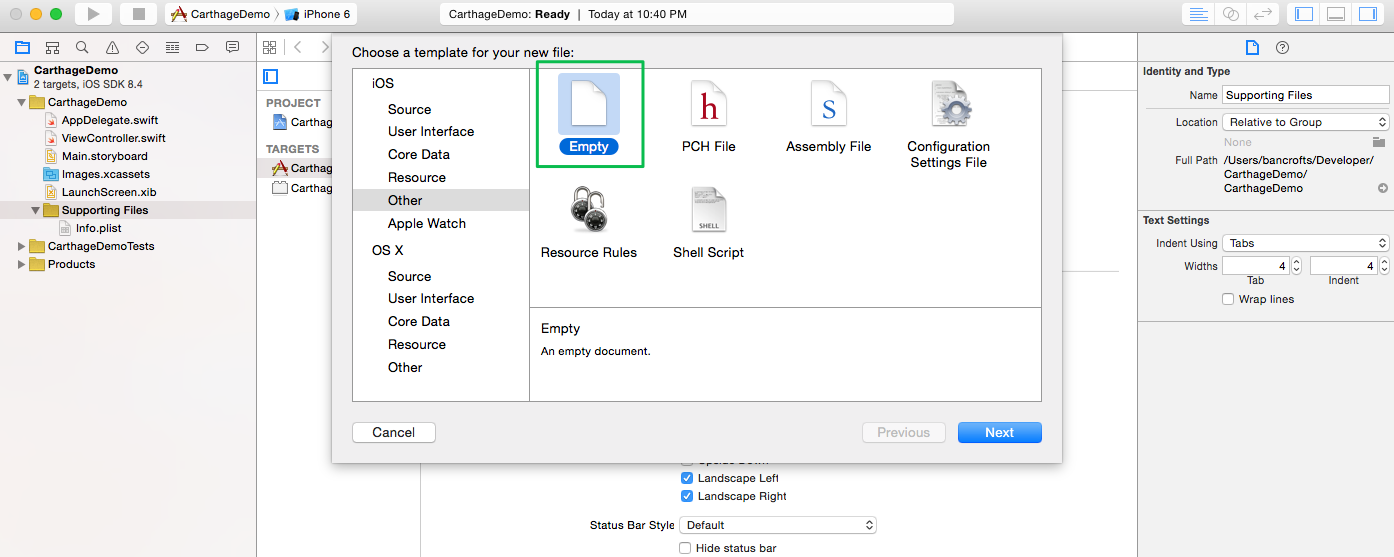
To demonstrate, here’s a couple of screenshots depicting how to add a Cartfile to your Xcode project…
Simply add a new Empty file, found under iOS -> Other:
In the new file dialog, simply type in “Cartfile”, and press Create:
Wrapping up
This is where I’m going to stop for now and defer to the Carthage GitHub documentation to explain more about what exactly to put into the Cartfile and how to run the subsequent commands to grab the libraries and frameworks you list, and build them so that they can be added to your Xcode project. I may pick this back up again, but this guide was starting to get lengthy, and I felt that actually building the frameworks from a Cartfile could very well deserve isolated treatment for the sake of clarity. If you’re interested in reading more on Carthage, sound off in the comments or shoot me an e-mail! Thanks for reading.