Up and Running with Unity IOC Container for ASP.Net MVC
The process for creating an ASP.Net MVC web application that relies on the Unity Inversion of Control (IOC) container has gotten quite a bit more streamlined since I first started working with it. However, since I don’t start brand new software projects often, it’s often the case that it takes me a few minutes to figure out which NuGet package to install to get things up and running.
The following is a quick-reference for myself, and for anyone else who’s interested in getting up and running quickly with the Unity IOC container for an ASP.Net MVC project.
Assumptions:
- Using Visual Studio 2013
-
Using ASP.Net MVC 5
- Have already created a new, fresh solution (File –> New Project, etc)
Walkthrough
Begin by right-clicking your solution, and choosing to “Manage NuGet Packages for Solution…”:
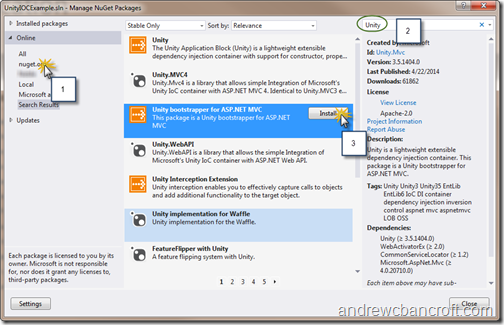
Next, choose to search for packages found at nuget.org. In the search bar in the upper right, type in “Unity”, and press enter. Choose to install “Unity bootstrapper for ASP.NET MVC”:
Now that the appropriate NuGet package is installed, you’re set to start using the Unity IOC Container.
Using Unity for Dependency Injection and Management
I’ve contrived an example and tried to show side-by-side views of the bare minimums you need to program in order to start taking advantage of Unity for managing your dependencies. I’m going to show how to inject a concrete implementation of a very simple Interface into the HomeController. The steps go something like this:
- Create an Interface (in this example, I called it IUnityExample) which specifies that an implementer of this interface must define an itWorksMessage method that returns a string.
- Create a new class called UnityExample. Specify that it implements IUnityExample in the class declaration line. Implement the required itWorksMessage method.
- In HomeController.cs, declare a private variable to hold an instance of an IUnityExample.
- In HomeController.cs, declare a new constructor which takes an IUnityExample (to be injected by Unity) and sets the privately declared IUnityExample variable to the instance that’s passed in.
-
Utilize the itWorksMessage somehow. In my example, I set the return value to a new dynamic property called ViewBag.Message inside the Index method.
- In UnityConfig.cs, register IUnityExample and UnityExample with the container inside the RegisterTypes method.
-
- In HomeController.cs, declare a new constructor which takes an IUnityExample (to be injected by Unity) and sets the privately declared IUnityExample variable to the instance that’s passed in.
- In HomeController.cs, declare a private variable to hold an instance of an IUnityExample.
- Create a new class called UnityExample. Specify that it implements IUnityExample in the class declaration line. Implement the required itWorksMessage method.
-
At this point, we’re done with writing C# code, and we’re ready to move into the View layer. This final step will access ViewBag.Message, and display it at the bottom of the page. It’s fairly straight-forward. Inside Views –> Home –> Index.cshtml, simply add a
To confirm everything works, run your solution and verify the results!
Summary
In this article, you’ve seen how to use NuGet to install the required components to get up and running with the Unity Inversion of Control container. Additionally, you saw a bare-bones example demonstrating the steps required to start using Unity to manage your dependencies with ASP.Net MVC.
comments powered by Disqus


